In order to debug the Azure website remotely first you have to open Server Explorer from the View menu. Once you click on the Server Explorer just expand the Windows Azure section. If you are not logged in to Azure account It may prompt you to login. Once you connect to your Windows Azure account you will be able to see all your websites which is already hosted in your Azure account.
Thursday, December 11, 2014
Not able to see Attach Debugger in Visual Studio for remote debugging in Azure
In order to debug the Azure website remotely first you have to open Server Explorer from the View menu. Once you click on the Server Explorer just expand the Windows Azure section. If you are not logged in to Azure account It may prompt you to login. Once you connect to your Windows Azure account you will be able to see all your websites which is already hosted in your Azure account.
Wednesday, December 10, 2014
How to find the files deployed in Windows Azure from Visual Studio.
Today we will see how to view the deployed website files in visual Studio and how to edit those files form Visual Studio.
Thursday, December 4, 2014
Disadvantage of enabling Session State in all ASP.NET pages
As you are aware session data is stored in the server if you use inProc mode. So if you have huge data in session all your server resource will be utilized. So the first thing is make sure whatever you are writing into the session is really required to be stored in session and clear the session as soon as you use the data from the session.
Tuesday, November 18, 2014
Attempt by security transparent method 'System.Web.Http.GlobalConfiguration.get_Configuration()' to access security critical type 'System.Web.Http.HttpConfiguration' failed.
So the simple solution to resolve this issue is upgrade your WEB API.
Easiest option to upgrade your WEB API is by using NuGet package manager.
TransactionScope in ASP.NET
TransactionScope is exactly same as the one we use in database level. But sometimes we may not use transaction at database level if the data/table we are operating is completely different and there is no connections.
Couple of important points you have to remember while using TransactionScope is, TransactionScope class cannot be inherited, also this is part of the System.Transactions which means if you wanted to use the class TransactionScope then first you have to refer to the assembly System.Transactions.

Monday, November 10, 2014
Filtered Index in MS SQL
Lets start with what is filtered index? A kind of interview question.
Filtered index is an optimized non clustered index. Filtered index is more suitable for the queries which select the data from a well defined subset. Important thing you have to remember about the filtered index is it uses the filter predicate to index only a portion of rows in a table. This is what I have mentioned above that “filtered index is suitable for the queries which select the data from a well defined subset”.
Does the filtered index improve the performance?
Monday, October 27, 2014
Connect LocalDB using Visual Studio
Lets start with what is Local DB?
In earlier version Visual Studio installation SQL express edition gets installed automatically. People were really confused with this database and was having difficult time in connecting and managing this database. So from Visual Studio 2012 onwards Microsoft decided to have LocalDB engine in place of SQL Server express. This is a very light weight database with a minimum set of files required to create a database and it will directly tied up with the project it is attached to.
Lets see how to start LocalDB.
Thursday, October 23, 2014
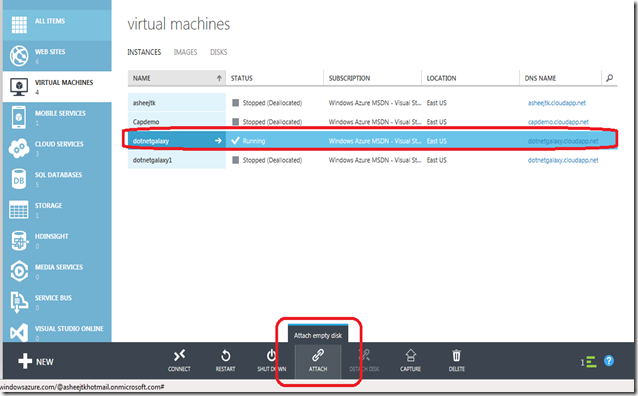
How to add additional disk in Microsoft Azure Virtual Machine
Lets start with step by step.
As usual first you have to login to your Azure account. Once you login directly go to the Virtual machine section and select the machine on which you wanted to add the additional disk space.
Wednesday, September 24, 2014
How to use OUTPUT Clause in MS SQL / What is the use of OUTPUT Clause?
Today we will learn some SQL. Have you ever used OUTPUT clause in MS SQL? What exactly us the use of OUTPUT clause in MS SQL? What is the advantage of using OUTPUT clause in SQL? All these questions are answered in this article.
What is OUTPUT clause in SQL?
OUTPUT clause gives you the information about each row impacted by running INSERT or UPDATE or DELETE or MERGE SQL statement. Normally in applications we use this information to return to the user in a meaningful manner to show the result of submitting the data.
What you can do is, you may save this information in a temporary table or in a permanent table itself for future use. You can use this information for auditing purpose also because it has got complete information about the sol statement which you executed row by row.
The main disadvantage of this OUTPUT clause is it returns the same information even if your SQL execution throws error or it is rolled back. So you need to make sure that such information should not be used for any auditing purpose or to pass the information to client.
Now lets see what kind of information we gets when we use OUTPUT clause.
First we will create a sample table.
CREATE TABLE [dbo].[tblBill](
[BillDate] [datetime] NULL,[Expense] [numeric](18, 0) NULL,
[travel] [numeric](18, 0) NULL
)
GO
Lets query the table and see the values we have inserted in this table.
Now we will delete one row with the OUTPUT clause and see the result and also the syntax to use output clause.
delete from [DemoAzure].[dbo].[tblBill]
OUTPUT DELETED.* where travel = 150As you can see above OUTPUT clause should be before where clause.
Once you execute this statement it will return the complete row which got deleted like a select statement. This is the reason I mentioned earlier that we can directly insert this values into a table for future use or for auditing purpose.
Lets see the result set now.
Lets see a sample code to insert the value in a table variable.
DECLARE @tblBillVar table(
[BillDate] [datetime] NULL,
[Expense] [numeric](18, 0) NULL,
[travel] [numeric](18, 0) NULL);
INSERT INTO [dbo].[tblBill] ([BillDate],[Expense],[travel])
OUTPUT INSERTED.[BillDate], INSERTED.[Expense], INSERTED.[travel]
INTO @tblBillVar
VALUES ('2015-01-06 00:00:00.000',875,475)select * from @tblBillVar
Once you execute above query you will find that the inserted values will be displayed in the query analyzer.
Similar to table variable you can have your own table as well.
I hope you are now clear about the OUTPUT clause in MS SQL.
Thursday, September 4, 2014
GROUPING SETS in MS SQL
Today we will see how we can use GROUPING SET in SQL query and when exactly we can use this query.
First we will create a table with the name tblStatistics.
Monday, August 11, 2014
Peek Definition VS Go To Definition in Visual Studio
Suppose you are debugging in your code and you reached to a function where you find an error. Earlier you have to go to the .CS page where you function is defined and have to change the code. In those case we just right click over the function and use Go to Definition option to navigate to the exact function.
Friday, August 1, 2014
GROUP BY clause to get comma separated values in MS SQL
We will create the table first.
CREATE TABLE [dbo].[StatusReport](
[StudentID] [int] NULL,
[Status] [nchar](10) NULL,
[Email] [varchar](50) NULL
)
Wednesday, July 16, 2014
How to find Quarter Name and Month Name from the Datetime in MS SQL
Since it is a simple query I thought I will share you he same as it may might be useful.
Lets create the table first.
create table Items
(
ItemName varchar(500),
uom char(200),
Quantity float(50),
Price numeric(5,2),
Bill_Date datetime
)
Monday, July 7, 2014
What is KUDU - Windows Azure Web Sites analysis tool
What is KUDU —> KUDU is a very user friendly troubleshooting and analysis tools for Windows Azure Web Sites.
Now we will see how to access KUDU console of your azure website. It is a very simple method.
Sunday, June 22, 2014
Regular expression to validate multiple Email IDs separated by comma
Regular expression you may use for this purpose is,
| ^\s*((\s*[a-zA-Z0-9\._%-]+@[a-zA-Z0-9\.-]+\.[a-zA-Z]{2,4}\s*[,]{1}\s*){1,100}?)?([a-zA-Z0-9\._%-]+@[a-zA-Z0-9\.-]+\.[a-zA-Z]{2,4})\s*$ |
Monday, June 16, 2014
How to install ASP.NET MVC 5 in Visual Studio 2013 using NuGet Package Manager
Once you install the NuGet package manager then we will open the console to install the ASP.NET MVC 5 template.
Wednesday, June 4, 2014
How to get Month wise summary in MS SQL
Mostly we require this query when we generate reports. Month wise report or Month and Year wise report definitely require such kind of query.
We will directly jump on to the solution and the query.
First we will create a table with datetime field and two numeric columns to get the sum based on the month and year.
Sunday, June 1, 2014
How to re-create designer.cs in Visual Studio 2013
Let’s see the step by step process by deleting the designer .cs first.

Tuesday, May 20, 2014
Not able to access classes in the App_Code folder in Visual Studio 2013
To resolve this issue what you have to do is right click on the class file and then select the properties.

Wednesday, April 9, 2014
Synchronize local MS SQL database to SQL Azure
SQL Azure allows you to configure this synchronization automatically and will allow you to set the frequency of data synchronization as well.
Ok, as usual we will go through the complete procedure step by step.
First we will create a database in our local database system and insert few data in the table.

Tuesday, April 8, 2014
Deploy ASP.NET web application in cloud with SQL Azure Connectivity
Lets go through the complete procedure you have to follow to do the web application deployment with SQL Azure.
Thursday, April 3, 2014
Ajax MutuallyExclusiveCheckBoxExtender in ASP.NET
It required hardly few lines of codes and it is very easy and simple to understand. In this article I am taking you through this interesting control which you can use in your application whenever you require Mutually Exclusive CheckBox.
First we will design a sample webpage by adding few check boxes. Your sample page design may look like below,

Saturday, March 29, 2014
Load balancing using Windows Azure Virtual Machine
Let’s go through step by step procedure.
Tuesday, March 25, 2014
How to Deploy ASP.NET web application in Windows Azure Virtual Machine
If you are not sure how to create Virtual Machine in Windows Azure you may read my article How to create Virtual Machine in Windows Azure
In this article I am explaining the steps you have to follow after creating the Virtual machine.
As usual first you have to login to the Virtual Machine by login to your Windows Azure account. You may open your Windows Azure account by opening Windows Azure Login Page
Tuesday, March 18, 2014
How to create Virtual Machine in Windows Azure
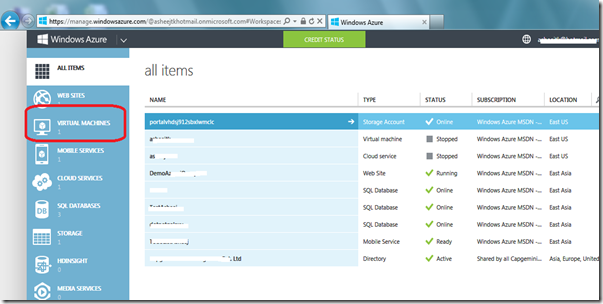
Let’s go through step by step procedure, first we will login to Windows Azure by opening Windows Azure Login Page
Monday, March 17, 2014
How to Create Database in SQL Azure
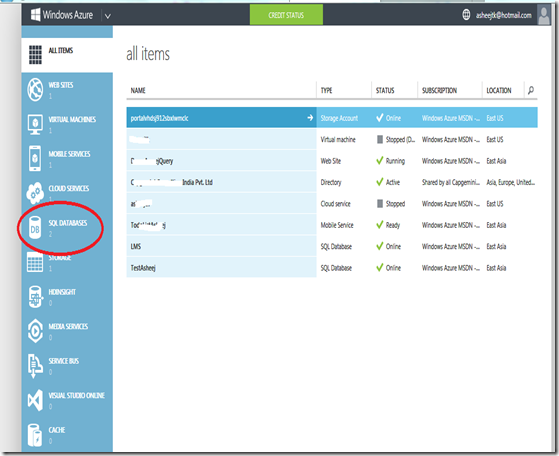
First we will connect to the Windows Azure. You should have a windows Azure account in order to login to Azure site. Here is the URL to login to Windows Azure.
Once you login to your account you will find below page.
Tuesday, March 11, 2014
REBOOT Bangalore - CloudCamp
Reboot is the first ever full day community driven multi city, multi-track event happening in Namma Bengaluru.
Reboot will witness great line up of speakers from different parts of India who are great community leaders, helping grow and shape the technical communities in their respective cities. Many of them are the Microsoft Most Valuable Professionals or Microsoft Employees.
Below are sessions planned for you with free meal @ ITC HOTEL WINDSOR SHERATON & TOWERS (Windsor Manor)
Join us with our MVPs as they discuss how you can build and scale in the cloud.
Thursday, March 6, 2014
How to write text on an Image using C#
Using this code you can write any text in an image at any place, using any color and format of the text.
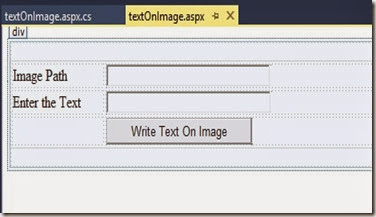
First we will look at the form design. The form looks like below,
Wednesday, February 26, 2014
How to find Operating System version using SQL query
There are some cases you wanted to check the Operating system installed on your SQL server. You may not have remote login access to the server where SQL server is installed in that case it will be difficult to know what is the operating system installed on your server where SQL database is installed.
In this article I am going to explain you the simple query which you can run in your SQL server Query analyzer and it will show you the Operating System version installed on your database server.
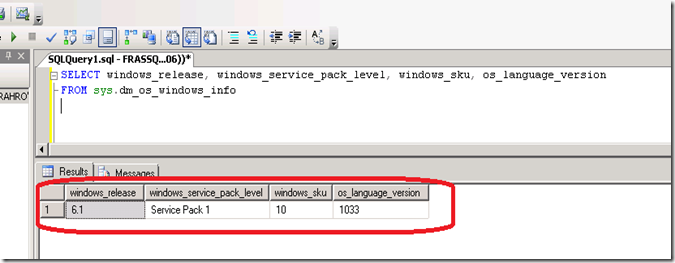
SQL Server by default provides you an inbuilt table with all the details of the operating system installed on your database server. sys.dm_os_windows_info is the table you may query in this regard.
Your final query will be,
SELECT windows_release, windows_service_pack_level, windows_sku, os_language_versionFROM sys.dm_os_windows_infoAnd the output of the above query will be,
| windows_release | windows_service_pack_level | windows_sku | os_language_version |
| 6.1 | Service Pack 1 | 10 | 1033 |
In the above result you can see that windows release is 6.1 means Windows Server 2008 R2 in my case. It can be Windows 7 if your database is not installed on the server.
You can find all the operating system version number in below chart.
| Operating system | Version number |
| Windows 8.1 | 6.3 |
| Windows Server 2012 R2 | 6.3 |
| Windows 8 | 6.2 |
| Windows Server 2012 | 6.2 |
| Windows 7 | 6.1 |
| Windows Server 2008 R2 | 6.1 |
| Windows Server 2008 | 6 |
| Windows Vista | 6 |
| Windows Server 2003 R2 | 5.2 |
| Windows Server 2003 | 5.2 |
| Windows XP 64-Bit Edition | 5.2 |
| Windows XP | 5.1 |
| Windows 2000 | 5 |
Saturday, February 15, 2014
How to use Timer / Stop Watch using JavaScript
In this article I am going to explain timer/stop watch function using JavaScript. In many situations we may get requirement to show the timer in your application. This article will help you to show the timer using JavaScript in a webpage.
To implement the timer first we will write JavaScript function and save it as .Timer.js.
var milliSec = 0;
var seconds = 0;
var minutes = 0;
function startTimer()
{
  var timerVal = document.getElementById('lblTimer');
  timerVal.value = minutes + ":" + seconds + ":" + milliSec;
  go=setTimeout("startTimer()",1);
  milliSec++;
    if(milliSec==100)
    {
      milliSec=0;
      seconds++;
    }
    if(seconds==60)
    {
      seconds=0;
      minutes++;
  }
}

 function stopTimer()
{
  clearTimeout(go)
}
Below is the HTML code to design the webpage. Here you can see that startTimer() and stopTimer fucntion is called on click of the button. Also you can see that I have referred the Timer.js Javascript file which is saved in the root folder.
<html>
  <head>
  <title>Timer Using JavaScript</title>
  <script type="text/javascript" src="Timer.js"></script>
  </head>
  <body>
    <form>
      <table>
      <tr>
          <td colspan="3" ><input id="lblTimer" type="text" name="displayTime" STYLE="color: red; border:0px; font-family: Verdana; font-weight: bold; font-size: 25px; " size="10" maxlength="30 value="00:00:00" /></td>
      </tr>
      <tr>
          <td>
            <input type="button" value="Start Timer" onclick="startTimer()"/>
            <input type="button" value="Stop Timer"  onclick="stopTimer()"/>
          </td>
       </tr>
       </table>
    </form>
  </body>
</html>
The output looks like below.
Monday, February 3, 2014
How to list all sub directories in a directory using C#
Do you want to display all directories in the specified directory using C#? Read this article to know how to list the subdirectories using .NET
Here first I added a Label, a TextBox, a Button and a ListBox to the form. Textbox is used to enter the folder path. Once you click on on the button sub directories will be shown in the list box.
We will see the page design first.
Below is the source code for the page design.
<%@ Page Language="C#" AutoEventWireup="true" CodeBehind="ListDir.aspx.cs" Inherits="Blog.ListDir" %> <!DOCTYPE html> <html xmlns="http://www.w3.org/1999/xhtml"> <head runat="server"> <title></title> <style type="text/css"> .auto-style1 { width: 100%; } .auto-style2 { width: 156px; } .auto-style3 { width: 156px; height: 26px; } .auto-style4 { height: 26px; } </style> </head> <body> <form id="form1" runat="server"> <div> </div> <table class="auto-style1"> <tr> <td class="auto-style3"> <asp:Label ID="lblDir" runat="server" Text="Enter the Root Directory"></asp:Label> </td> <td class="auto-style4"> <asp:TextBox ID="txtPath" runat="server"></asp:TextBox> </td> <td class="auto-style4"></td> </tr> <tr> <td class="auto-style2"> </td> <td> <asp:Button ID="btnDisplay" runat="server" Text="Show All Sub Directories" OnClick="btnDisplay_Click" /> </td> <td> </td> </tr> <tr> <td class="auto-style2"> </td> <td> <asp:ListBox ID="lstDir" runat="server" Height="124px" Rows="5" Width="154px"></asp:ListBox> </td> <td> </td> </tr> </table> </form> </body> </html>
On Button Click event write the following code.
using System;
using System.Collections.Generic;
using System.Linq;
using System.Web;
using System.Web.UI;
using System.Web.UI.WebControls;
using System.IO;

namespace Blog
{
    public partial class ListDir : System.Web.UI.Page
    {
        protected void Page_Load(object sender, EventArgs e)
        {
            lstDir.Visible = false;
        }

        protected void btnDisplay_Click(object sender, EventArgs e)
        {
            lstDir.Visible = true;
            lstDir.Items.Clear();
            string strFolderPath = txtPath.Text;
            DirectoryInfo dirInfo = new DirectoryInfo(strFolderPath);
            if (dirInfo.Exists)
            {
                DirectoryInfo[] dirSubDir = dirInfo.GetDirectories();
                for (int i = 0; i < dirSubDir.Length; i++)
                {
                    lstDir.Items.Add(dirSubDir[i].ToString());
                }
            }
            else
            {
                lstDir.Items.Add("No such directory...");
            }
        }
    }
}
And the final output will be like below,
Wednesday, January 29, 2014
How to share folders using C# .NET
There are many cases you may have to share the data with other computer/Users. If anybody have more than one computer and want to transfer some file over it you have to share the folder so that other users will be able to access the files inside the shared folder. Read this article to learn how to share a folder over your local network using ASP.NET.
For implementing this concept I have created one webpage like below.
<%@ Page Language="C#" AutoEventWireup="true" CodeBehind="ShareFolder.aspx.cs" Inherits="Blog.ShareFolder" %><!DOCTYPE html>
<html xmlns="http://www.w3.org/1999/xhtml">
<head runat="server">
<title></title>
<style type="text/css">
.auto-style1 {width: 100%;
}
.auto-style2 {width: 169px;
}
</style>
</head>
<body>
<form id="form1" runat="server">
<table class="auto-style1">
<tr>
<td class="auto-style2">
<asp:Label ID="Label1" runat="server" Text="Share Folder Path"></asp:Label>
</td>
<td>
<asp:TextBox ID="txtPath" runat="server"></asp:TextBox>
</td>
</tr>
<tr>
<td class="auto-style2">
<asp:Label ID="Label2" runat="server" Text="Share Folder Name"></asp:Label>
</td>
<td>
<asp:TextBox ID="txtName" runat="server"></asp:TextBox>
</td>
</tr>
<tr>
<td class="auto-style2">
<asp:Label ID="Label3" runat="server" Text="Share Folder Description"></asp:Label>
</td>
<td>
<asp:TextBox ID="txtDesc" runat="server"></asp:TextBox>
</td>
</tr>
<tr>
<td class="auto-style2"> </td>
<td>
<asp:Button ID="btnShare" runat="server" OnClick="btnShare_Click" Text="Share Folder" />
</td>
</tr>
</table>
<div>
<asp:Label ID="lblResult" runat="server"></asp:Label>
</div>
</form>
</body>
</html>
Here I am using three TextBox.
1. txtPath - To enter complete folder path which you want to share
2. txtName - Folder name to be displayed for shared folder
3. txtDesc - Description for the shared folder
First we need to create a directory and subdirectories in the specified path given in the first TextBox.
Directory.CreateDirectory(strSharePath);
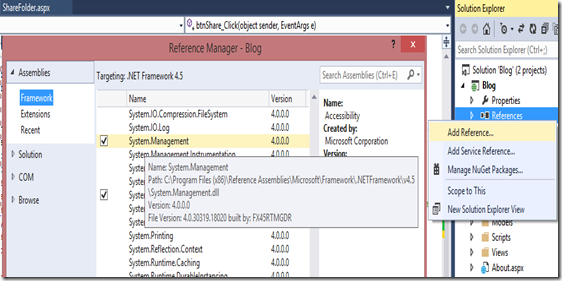
Next step is to create a management class. For that we need to add a reference System.Management. You can refer below screen print to know how to add the reference.
Then create a Shared folder with the name and description what we got through TextBox.
Here is the complete code you may use for this purpose:
using System;using System.Collections.Generic;using System.Linq;using System.Web;using System.Web.UI;using System.Web.UI.WebControls;using System.IO;using System.Management;namespace Blog{public partial class ShareFolder : System.Web.UI.Page
{protected void Page_Load(object sender, EventArgs e)
{}
protected void btnShare_Click(object sender, EventArgs e)
{ string strSharePath = txtPath.Text.ToString(); string strShareName = txtName.Text.ToString(); string strShareDesc = txtDesc.Text.ToString(); try {Directory.CreateDirectory(strSharePath);
ManagementClass oManagementClass = new ManagementClass("Win32_Share");
ManagementBaseObject inputParameters = oManagementClass.GetMethodParameters("Create");ManagementBaseObject outputParameters;
inputParameters["Description"] = strShareDesc; inputParameters["Name"] = strShareName; inputParameters["Path"] = strSharePath;inputParameters["Type"] = 0x0;//disk drive
inputParameters["MaximumAllowed"] = null;
inputParameters["Access"] = null;//Make Everyone has full control access
inputParameters["Password"] = null;
outputParameters = oManagementClass.InvokeMethod("Create", inputParameters, null);//// Invoke the method on the ManagementClass object
if ((uint)(outputParameters.Properties["ReturnValue"].Value) != 0)
{throw new Exception("There is a problem while sharing the directory.");
}
else { lblResult.Text = "Share Folder has been created with the name :" + strShareName;}
}
catch(Exception ex) {lblResult.Text = ex.Message.ToString();
}
}
}
}
You have many more options for the Create method of the Win32_Share class, you can read all this option from MSDN article.
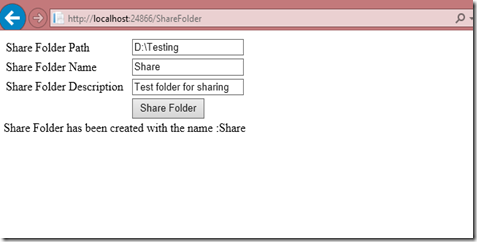
After running the code, you will be seeing the interface like below. You can also see the data which you need to enter in below screen print.
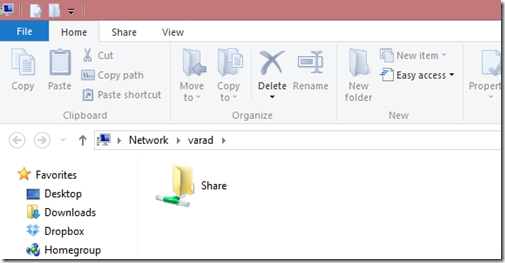
Once you execute the code successfully your folder will be shared like below,
Thursday, January 23, 2014
Ajax Animation Extender control
Are you thinking of decorating your website with some animation? Then there is one simple and useful control in AjaxControlToolkit named Animation extender which help you to give excellent animation to your pages.
You can apply animations to target control when some events likes, OnLoad, OnClick, OnMouseOver, or OnMouseOut raised. Here I am trying to explain how this Ajax Animation Control will work.
STEP : 1 Create a new webform
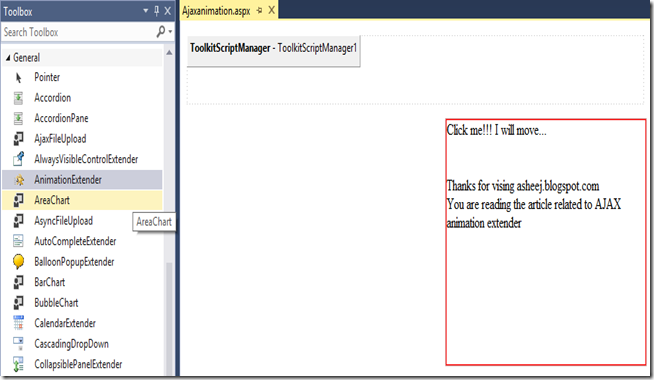
Create a new webform in ASP.NET. Drag and drop ToolScriptManager, Panel and a Animation Extender control.
STEP 2 : Create a CSS class to the panel
Here I am using a panel for animation which is the target control. First I created a style sheet for the panel.
<style>
.animationPanel
{position : absolute;
height : 250px;
width: 300px;
top: 100px;
left: 400px;
border-width: 2px;
border-color:red;
border-style:solid;
}
</style>
STEP 3 : Write animation properties
First I set animation property for the text inside the panel and then I set the animation for panel. Here I am doing the animation sequentially. I wrote the code on click event of the panel.
So the entire .aspx page looks like below.
<%@ Page Language="C#" AutoEventWireup="true" CodeBehind="Ajaxanimation.aspx.cs" Inherits="Blog.Ajaxanimation" %><%@ Register assembly="AjaxControlToolkit" namespace="AjaxControlToolkit" tagprefix="asp" %><!DOCTYPE html>
<html xmlns="http://www.w3.org/1999/xhtml">
<head runat="server">
<title>AjaxAnimation</title>
<style>
.animationPanel
{position : absolute;
height : 250px;
width: 300px;
top: 100px;
left: 400px;
border-width: 2px;
border-color:red;
border-style:solid;
}
</style>
</head>
<body>
<form id="form1" runat="server">
<div>
<asp:ToolkitScriptManager ID="ToolkitScriptManager1" runat="server">
</asp:ToolkitScriptManager>
<br />
<asp:Panel ID="ajaxPanel" runat="server" CssClass="animationPanel">
Click me!!! I will move...<br><br><br>
<div id ="info">
Thanks for vising asheej.blogspot.com<br>
You are reading the article related to AJAX animation extender
</div>
</asp:Panel>
<asp:AnimationExtender ID="AnimationExtender1" runat="server" TargetControlID="ajaxPanel">
<Animations>
<OnClick>
<Sequence><%-- Sequance is used to do the animation sequantially --%>
<%-- Below code will help you to move the Panel --%>
<Parallel AnimationTarget="info" Duration=".2">
<Color PropertyKey="color"
StartValue="#0000CD" EndValue="#FF0000" />
<Color PropertyKey="borderColor"
StartValue="#0000CD" EndValue="#FF0000" />
</Parallel>
<Parallel AnimationTarget="info" Duration=".2">
<Color PropertyKey="color"
StartValue="#FF0000" EndValue="#666666" />
<Color PropertyKey="borderColor"
StartValue="#FF0000" EndValue="#666666" />
</Parallel>
<Parallel AnimationTarget="flyout" Duration=".1" Fps="30">
<Move Horizontal="200" Vertical="-75" />
<Resize Height="300" Width="300" />
<Color AnimationTarget="info" PropertyKey="backgroundColor"
StartValue="#ADFF2F" EndValue="#00FFFF" />
</Parallel>
</Sequence>
</OnClick>
</Animations>
</asp:AnimationExtender>
</div>
</form>
</body>
</html>
STEP 4 : Build the solution and run the application
After running the code the result should be looks like this:
AnimationExtender Control properties:
- TargetControlID : It is the ID of the control to which animation occurs.
- OnLoad : Set the animation when the page is loaded
- OnClick : Set the animation when the target control is clicked
- OnMouseOver : Set the animation when the mouse moves over the target control
- OnMouseOut : Set the animation when the mouse moves out the target control
- OnHoverOver : Set the animation when the mouse moves over the target control. But it stop the OnHoverOut animation before it plays.
- OnHoverOut : Set the animation when the mouse moves out the target control. But it stop the OnHoverOver animation before it plays.
Wednesday, January 22, 2014
Ajax rating Control
Are you planning to use Rating Control in your application from Ajax Control toolkit? This article is trying to give information on AJAX Rating Control and how to use this control. The main purpose of AJAX Rating Control is to give a chance to user for rating or reviewing content in your website.
To use Ajax Rating Control, first we have to install Ajax control toolkit. If you haven’t installed AjaxControlToolkit you may refer my article How to Install AjaxControlToolkit
Let me show you how I used Ajax Rating control.
Step 1 : Create .aspx page
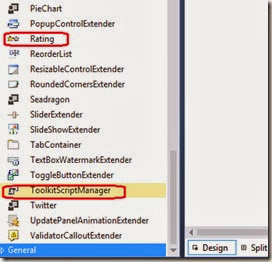
First we need to add One Label, ToolkitScriptManager and Ajax rating Control to the webpage.
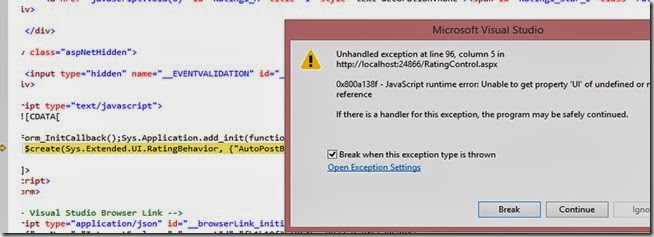
Do you have any doubt, why I have used ToolkitScriptManager instead of ScriptManager? First I dropped ScriptManager in the webpage but while running, I got an error “0x800a138f - JavaScript runtime error: Unable to get property 'UI' of undefined or null reference” like below.
This exception can be avoided using toolscriptManager because most of the controls from AjaxToolKit work using Ajax script. ToolkitScriptManager adds most of the updated Ajax Script.
Step 2 : Create CSS files and save images
Here I am using 3 images to show the state (Empty,Filled, Saved) of rating control. For that you need to create a folder in your project root directory and save three star images for visible star, star in waiting mode and star in filled mode.
Now the time for adding CSS class in the head section.
.filledRatingStar {background-image: url(Images/FilledStar.png);
}
.emptyRatingStar {background-image: url(Images/EmptyStar.png);
}
.savedRatingStar {background-image: url(Images/SavedStar.png);
}
Step 3 : Set some properties of Ajax rating control
Some properties need to set to Ajax rating Control. They are :
- CurrentRating - Initial rating value
- Direction - Orientation of the stars
- MaxRating - Initial rating value
- EmptyStarCssClass - CSS class for star in empty mode
- FilledStarCssClass - CSS class for star in filled mode
- StarCssClass - CSS class for a visible class
- WaitingStarCssClass - CSS class for the star in waiting mode
After doing all the above 3 steps,the source page should look like this:
<%@ Page Language="C#" AutoEventWireup="true" CodeBehind="RatingControl.aspx.cs" Inherits="Blog.RatingControl" %><%@ Register assembly="AjaxControlToolkit" namespace="AjaxControlToolkit" tagprefix="asp" %><!DOCTYPE html>
<html xmlns="http://www.w3.org/1999/xhtml">
<head runat="server">
<title></title>
<style>
.ratingStar {font-size: 0pt;
width: 15px;
height: 50px;
margin: 0px;
padding: 0px;
cursor: pointer;
display: block;
background-repeat: no-repeat;
}
/*You need to make sure that Images folder is created in your Project root directory and copy the images in this folder */
.filledRatingStar {background-image: url(Images/FilledStar.png);
}
.emptyRatingStar {background-image: url(Images/EmptyStar.png);
}
.savedRatingStar {background-image: url(Images/SavedStar.png);
}
</style>
</head>
<body style="height: 83px">
<form id="form1" runat="server">
<div>
<asp:ToolkitScriptManager ID="ToolkitScriptManager1" runat="server">
</asp:ToolkitScriptManager>
<asp:Label ID="lblrate" runat="server" Text="Rate this blog"></asp:Label>
<asp:Rating ID="Rating1" runat="server" RatingAlign="Horizontal"
CurrentRating ="1"
EmptyStarCssClass="emptyRatingStar"
FilledStarCssClass="filledRatingStar"
RatingDirection="LeftToRightTopToBottom"
StarCssClass="ratingStar"
WaitingStarCssClass="savedRatingStar"
Direction="LeftToRight">
</asp:Rating>
</div>
</form>
</body>
</html>
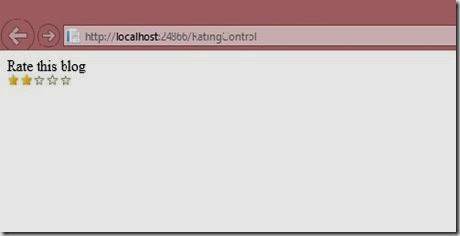
Output
Hope you enjoy reading this article, if you have any comment please post below…
Tuesday, January 21, 2014
Could not load file or assembly 'AjaxMin, Version=4.97.4951.28478, Culture=neutral, PublicKeyToken=21ef50ce11b5d80f' or one of its dependencies. The system cannot find the file specified.
This is one of the common error you get when you start using AJAX first time in your project. Nothing to panic about this, you can easily resolve the error “System.IO.FileNotFoundException: Could not load file or assembly 'AjaxMin, Version=4.97.4951.28478, Culture=neutral, PublicKeyToken=21ef50ce11b5d80f' or one of its dependencies. The system cannot find the file specified.” by copying the missing dll in the correct folder.
If you look at the error once again you may notice that error clearly suggest it cannot find the assembly 'AjaxMin’ which means once you open your project bin folder you may not find the 'AjaxMin.dll’ file.
So to resolve this issue what you have to do is, search for 'AjaxMin.dll’ and copy this into the project bin folder.
After copying this 'AjaxMin.dll’ in your project bin folder try to run the application and see if it works fine.


