Are you looking for a way to connect windows Azure and create database? If you wanted to know how to create database table in Microsoft cloud then ready this article. Here I am going to explain how to create database, how to create table and then finally how to query the table from SQL Azure.
First we will connect to the Windows Azure. You should have a windows Azure account in order to login to Azure site. Here is the URL to login to Windows Azure.
Once you login to your account you will find below page.
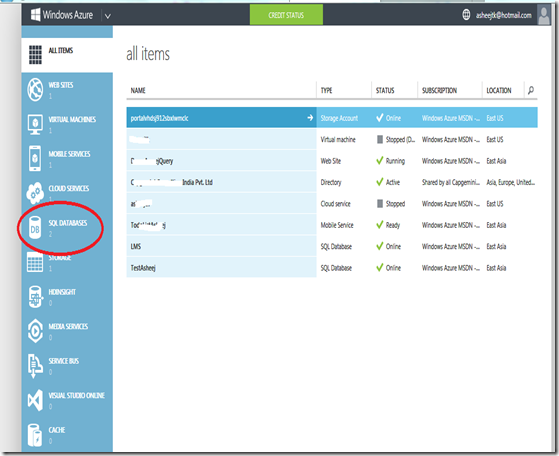
Since we are trying to create the Database we will directly jump on to the SQL Database section. When you click on the SQL Database menu it will show all databases created and also it will show the status of the Database. In below screen print you can see the status as online which means database is running.
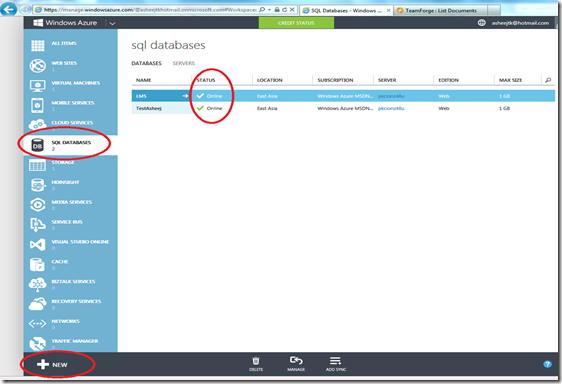
Now we will click on the New button to create the new database. When you click on the “New” button it will take you to the options and will ask you to enter the Database name. Here you will enter only the Database name you want to create. Server name will be populated automatically and you will not be able to enter the server name as it will be decided by the Azure by it’s own.
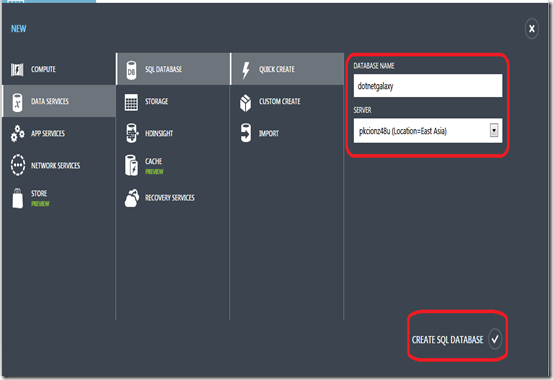
Click on “Create SQL Database” button to create the database. Once you click on the button you can see the message as “Creating…”.
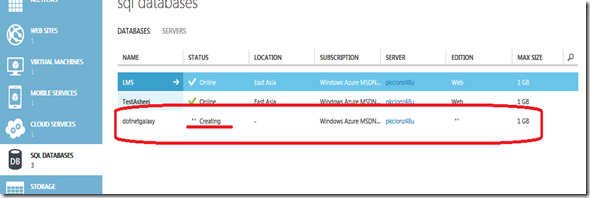
Once the database is created, you can see that the database named “dotnetgalaxy” and the status as “Online”.
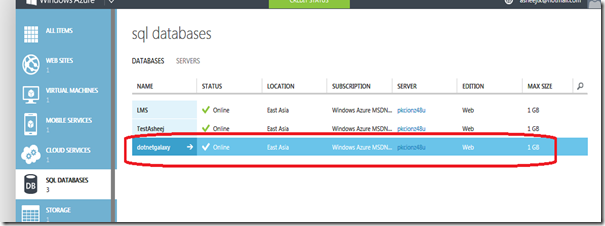
To know the database details and also to configure and create the table just double click on click on the arrow.
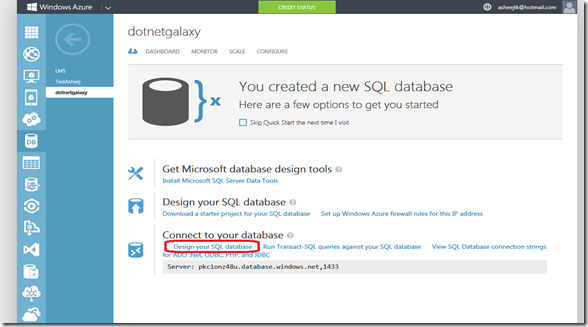
Once you click on the arrow you will be taken to the dashboard. Here you may click on the “Design your SQL Database” link to login to the database and to create the table. When you click on this link it will show an alert to add your system IP to the existing firewall rules.
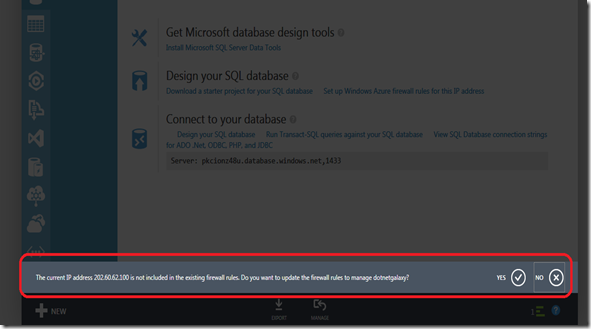
Click Ok to add the IP address to the existing firewall rules. Once you click on Yes button it will show another alert “Do you want to manage the dotnetgalaxy now?”
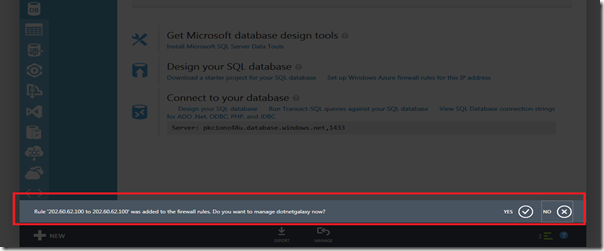
Once you click on YES button you will be taken to the login page.
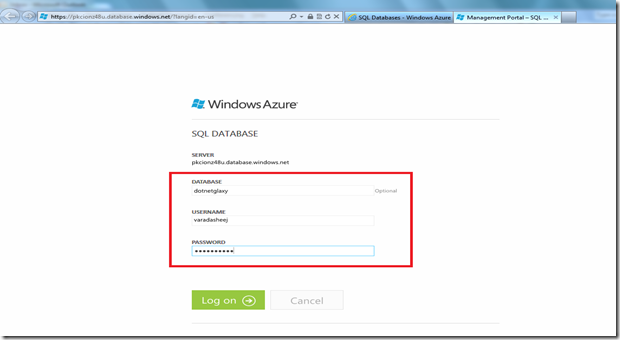
Here you may provide the user Id and password to login to the database. This is the same user id and password you have given while creating the Database server. Once you login successfully you will be taken to the database design section where you will be able to create the table.
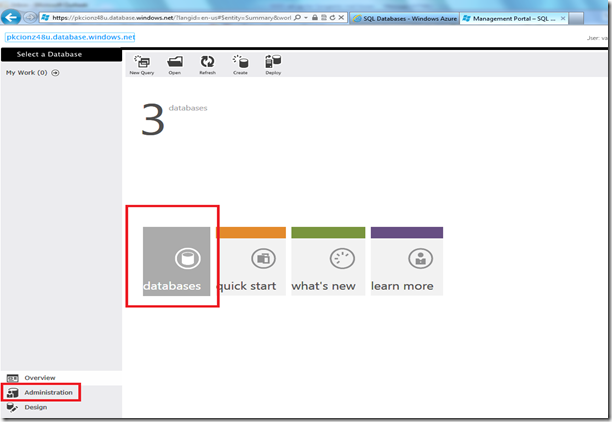
Here you may click on the Databases to open the database list or to the Administration link.
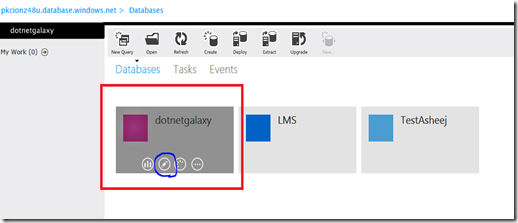
Just move the mouse over the database you wanted to design. While moving the mouse you may notice a pen icon which is highlighted in blue in above image. Just click on this small icon.
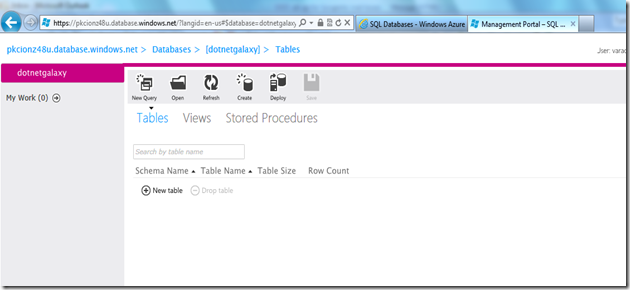
If you look at the above image all the icons are self explanatory. If you want to create table click on the New table button. For view and stored procedure you may click on respective links. Since we are going to create sample table. I have clicked on “New Table” link.
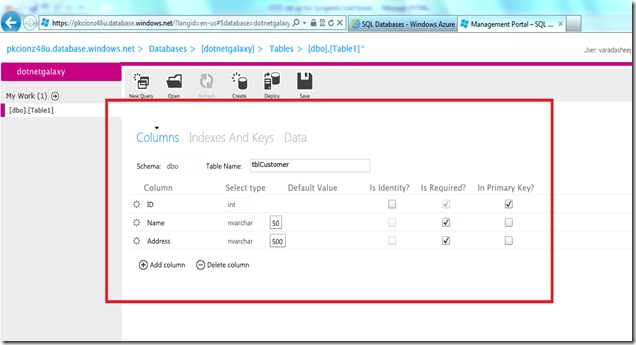
By default it will add three columns in your table but you can change this to suite your requirement. Here I am creating the table named “tblCustomer” and will be adding three fields name ID, Name and Address. Once you enter all the details you require just click on the save button at the top of the window.
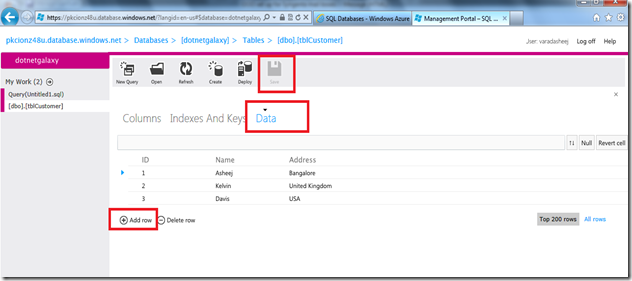
So now we have the table ready. Since the table is ready we will insert some data by clicking on the Data Link and then by clicking the Add Row. Here also once you enter required data click on save.
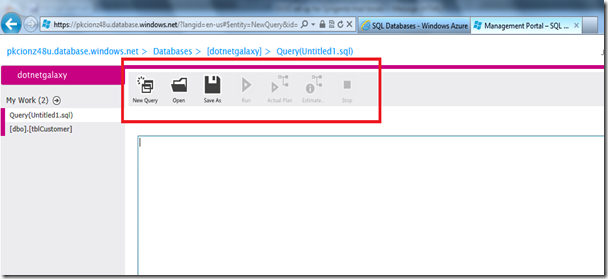
Now we have table and data so it’s the time to run a simple query and see how data is displayed. For that first we open the Query window to type the SQL query by clicking on the New Query button.
We will write a simple select query and run to see the result. All options required to run the query is highlighted in below screen print.
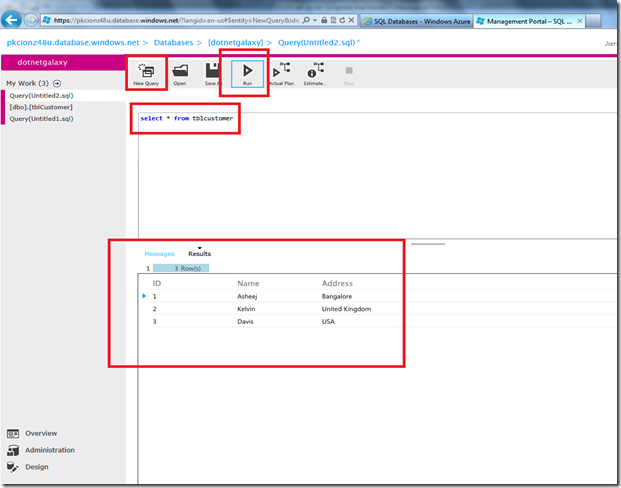
Once you click on the Run button you will see the result same as your SQL query analyzer.
I hope now you guys are familiar with creating database, creating table, inserting data and finally to run the query in windows azure database.
As usual please write your comment below.
First we will connect to the Windows Azure. You should have a windows Azure account in order to login to Azure site. Here is the URL to login to Windows Azure.
Once you login to your account you will find below page.

Since we are trying to create the Database we will directly jump on to the SQL Database section. When you click on the SQL Database menu it will show all databases created and also it will show the status of the Database. In below screen print you can see the status as online which means database is running.

Now we will click on the New button to create the new database. When you click on the “New” button it will take you to the options and will ask you to enter the Database name. Here you will enter only the Database name you want to create. Server name will be populated automatically and you will not be able to enter the server name as it will be decided by the Azure by it’s own.

Click on “Create SQL Database” button to create the database. Once you click on the button you can see the message as “Creating…”.

Once the database is created, you can see that the database named “dotnetgalaxy” and the status as “Online”.

To know the database details and also to configure and create the table just double click on click on the arrow.

Once you click on the arrow you will be taken to the dashboard. Here you may click on the “Design your SQL Database” link to login to the database and to create the table. When you click on this link it will show an alert to add your system IP to the existing firewall rules.

Click Ok to add the IP address to the existing firewall rules. Once you click on Yes button it will show another alert “Do you want to manage the dotnetgalaxy now?”

Once you click on YES button you will be taken to the login page.

Here you may provide the user Id and password to login to the database. This is the same user id and password you have given while creating the Database server. Once you login successfully you will be taken to the database design section where you will be able to create the table.

Here you may click on the Databases to open the database list or to the Administration link.

Just move the mouse over the database you wanted to design. While moving the mouse you may notice a pen icon which is highlighted in blue in above image. Just click on this small icon.

If you look at the above image all the icons are self explanatory. If you want to create table click on the New table button. For view and stored procedure you may click on respective links. Since we are going to create sample table. I have clicked on “New Table” link.

By default it will add three columns in your table but you can change this to suite your requirement. Here I am creating the table named “tblCustomer” and will be adding three fields name ID, Name and Address. Once you enter all the details you require just click on the save button at the top of the window.
So now we have the table ready. Since the table is ready we will insert some data by clicking on the Data Link and then by clicking the Add Row. Here also once you enter required data click on save.

Now we have table and data so it’s the time to run a simple query and see how data is displayed. For that first we open the Query window to type the SQL query by clicking on the New Query button.

We will write a simple select query and run to see the result. All options required to run the query is highlighted in below screen print.

Once you click on the Run button you will see the result same as your SQL query analyzer.
I hope now you guys are familiar with creating database, creating table, inserting data and finally to run the query in windows azure database.
As usual please write your comment below.

No comments:
Post a Comment